
You may have seen an undermount sink if you’ve ever admired those clean, seamless kitchen counters where the sink seems to melt right into the surface. They are placed under the counter instead of on top of it, which makes the counter look flat and smooth. You can install one of these upgrades yourself if you’re handy, and it instantly makes a kitchen feel more custom and high-end.
I’ve helped a few friends put undermount sinks in granite and quartz countertops. It’s not rocket science, but it does take some time. The most important things are to plan ahead, get good help, and make sure the seal is right so it doesn’t leak. Let’s go through the process step by step, just like you would at home.
Why Choose an Undermount Sink
Before you start, it’s helpful to know why undermount sinks are so popular.
First, looks. When there isn’t a rim on the counter, everything feels smoother and more open. The countertop surface goes all the way to the edge of the sink, making the kitchen look bigger and cleaner.
The second most common reason is that they are easy to clean. You can clean up spills or crumbs right from the counter into the sink. There is no edge to catch dirt or crumbs.
Stone countertops like granite, marble, and quartz can hold the weight and keep the sink in place, so undermount sinks often look great with them.
What You’ll Need
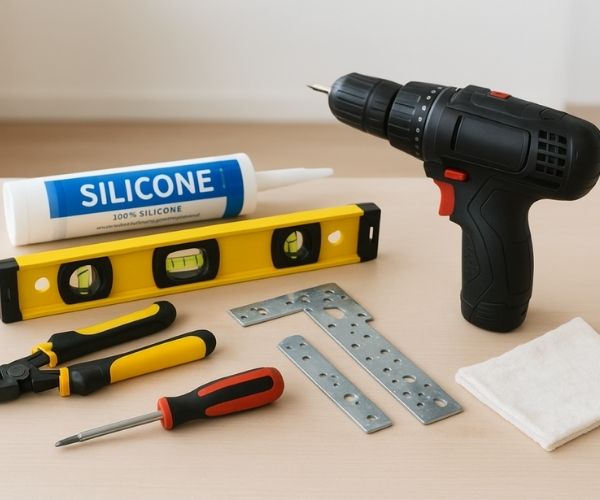
Here is a short list of things you will need to have before you start. You might already have some of this in your toolbox:
- Your sink that goes under the counter.
- Mounting clips or sink brackets (which usually come with the sink).
- Silicone sealant that is waterproof and safe for kitchens and bathrooms.
- Use rubbing alcohol or denatured alcohol to clean.
- A screwdriver or drill.
- Clamps or support bars to hold the sink in place while you mount it.
- A level.
- Rags or towels.
- A friend (seriously, it helps!)
Step 1: Prepare the Countertop

Most undermount sinks are made of solid surface materials like marble, granite, or quartz.Before you can put in a new drop-in sink, you need to take out the old one and clean the area well.
Use rubbing alcohol or a mild cleaner to get rid of dirt, old glue, or grease. If your surface is cleaner, your seal will work better.
If your countertop has already been cut to fit the new sink, that’s great. If not, it needs to be cut exactly to fit the sink’s size. A lot of people let the countertop fabricator do this, especially when it comes to stone surfaces.
Step 2: Check the Sink’s Fit
Before you attach anything permanently, make sure the sink fits. Put it under the countertop cutout to make sure it fits snugly and lines up with the edges.
It should be right in the middle of the opening. Make sure the plumbing lines, drain, and faucet hole all line up. A small change now will save you a lot of trouble later.
Step 3: Mark and put up the mounting hardware
You will have brackets or mounting clips depending on what kind of sink you have. These will hold the sink firmly to the bottom of your countertop.
Put these brackets in the right place.For larger sinks, there are usually four or more, and for smaller sinks, there are usually two on each side.Drill pilot holes with care. You’re only making a place for the clips to grab, so don’t go too deep.
Step 4: Use silicone sealant
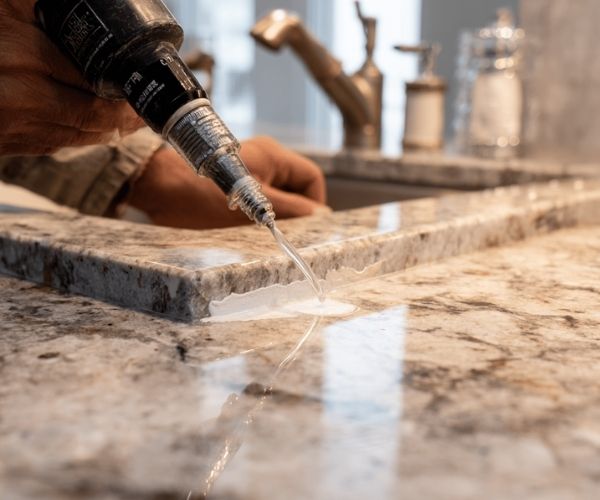
This step is very important for the whole job.
Put a steady layer of silicone sealant on the bottom of the countertop cutout. To make a waterproof seal between the sink and the countertop, all you need to do is draw a line that is smooth and even, not thick.
Think of it as a slow and steady process, like icing the edge of a cake.
Read More: Porcelain Countertops
Step 5: Put the sink in place
The hard part is putting the sink in place while keeping it perfectly level.
Having a second person really helps here. Put the sink in the right place. Press it firmly but gently against the bottom of the counter.
While you tighten the clips or brackets, use your clamps or temporary supports (some people use wood pieces or even a jack stand under the sink) to hold it in place.
Use a level to make sure the sink isn’t leaning. Make any changes you need to before the sealant dries.
Let the silicone sit for about an hour so that it can start to cure.
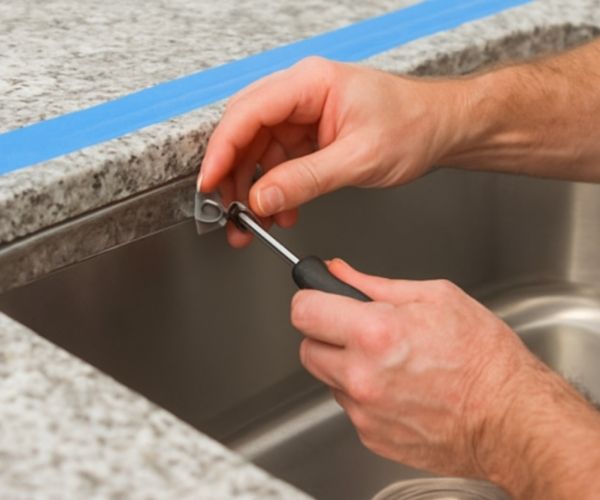
Step 6: Make sure everything is tight.
After your sink is in the right place and secure, make sure to fully tighten the mounting clips. Don’t break anything; just tighten it enough to keep the sink in place.
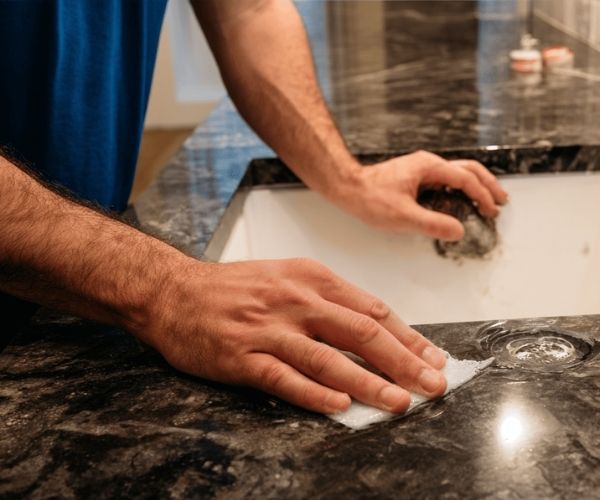
Use a damp cloth to wipe away any extra silicone that drips out around the edges. The line will stay neat and clean because of this.
Step 7: Put in the drain and faucet
After the sink is securely in place, it’s time to put in the faucet and drain assembly.
If your faucet mounts straight into the countertop, do this before putting the plumbing back together. If you have an undermount sink with built-in faucet holes, make sure to follow the manufacturer’s instructions for how to install it.
Put the drain back on, connect the water lines, and use plumber’s putty where needed.
Step 8: Let the sealant dry.
Most silicone sealants need at least 24 hours to fully dry. Don’t put anything heavy in the sink or run water while you do this.
Look at the seal closely after it has dried. If you see any holes or uneven spots, you can strengthen, it with a small bead of silicone.
Read More: Granite vs Quartz
Step 9: Check for leaks
Fill the sink with water after the sealant has dried completely.Check for leaks near the seams or drain.Tighten the fittings if you need to.
Well done! If everything looks dry and solid, you have just put in an undermount sink.
How to Install More Cleanly and Last Longer
- Use the right sealant: Always choose a high-quality silicone that says it can be used in the kitchen or bathroom.
- Support heavy sinks: Some big sinks, like those made of granite or cast iron, may need extra brackets to hold them up.
- Keep the area where the countertop edge meets the sink dry and clean to keep mold and stains from forming.
- Don’t tighten it too much; you want your countertop to fit snugly, not break under pressure.
Things You Shouldn’t Do
To avoid the dry fit, always check that the pieces are lined up before putting on the sealant.
Using too much silicone: Putting on too much silicone can make things weaker, seal them, and make a mess.
Not using enough support: If you only use clips to hold the sink in place while it dries, it might bend a little.
Not cleaning the bottom of the counter: Any dirt or residue could eventually break the seal.